AI video tools have changed how content is made. What used to take hours of editing, scripting, and production can now be done in minutes. If you want to create viral videos for TikTok, YouTube Shorts, or Instagram Reels, learning how to use AI video generator apps is one of the fastest ways to get started.

This guide walks you through the exact process beginners are using in 2026, including the latest AI video models and platforms, so you can choose the right tools and build a workflow that actually works.
What Are AI Video Generator Apps
AI video generator apps turn simple inputs like text, images, or prompts into fully edited videos. Depending on the tool, you can generate:
-
Short-form viral clips
-
Cinematic AI scenes
-
Talking avatar videos
-
Animated storytelling content
Today's ecosystem is evolving fast, with both consumer-friendly apps and advanced AI models.
Popular tools and models include:
-
Runway ML
-
Pika Labs
-
CapCut
-
Google Veo (including newer versions like Veo 3)
-
Sora (status changing, see below)
-
Jimeng(seedance 2.0)
-
Grok
-
Meta AI
Step 1: Choose the Right AI Video Tool (2026 Updated)
Not all tools are the same. In 2026, you can divide them into three main categories:
1. Beginner-Friendly Apps (Fast Content Creation)
These are best if your goal is TikTok / Shorts growth:
-
CapCut
-
Pictory
-
Synthesia
Use these if:
-
You want quick results
-
You don't need cinematic quality
-
You focus on volume content
2. Advanced AI Video Models (High Visual Quality)
These tools are driving the biggest trend right now:
-
Runway ML
-
Pika Labs
-
Google Veo (including newer Veo 3 capabilities)
-
Seedance 2.0
Key differences:
-
Veo (including Veo 3)
Focuses on highly realistic, longer-form AI video generation with better motion consistency -
Seedance 2.0
Known for smoother animation, better motion control, and more stable scene transitions -
Runway / Pika
More accessible, widely used, and already integrated into creator workflows
Use these if:
-
You want cinematic or "wow" visuals
-
You aim for viral, eye-catching content
-
You are experimenting with AI storytelling
3. Experimental & Ecosystem AI (Worth Watching)
These tools are not always direct video generators, but they are becoming part of the workflow:
-
Grok
-
Meta AI
They help with:
-
Idea generation
-
Prompt writing
-
Content scripting
Important Note About Sora
-
Sora gained huge attention for its high-quality video generation
-
However, its public availability and feature access are changing, and some versions or access paths are expected to be limited or phased out
So for beginners:
-
Do not rely entirely on Sora
-
Focus on tools you can actually use today (Runway, Pika, Veo ecosystem)
Step 2: Start With Proven Content Formats (Not Random Ideas)
Most beginners get stuck here: they try to "come up with something original."
In reality, that's not how most AI video creators grow.
What actually works is:
using proven formats and repeating them with variations.
From real creator discussions and workflows, especially in communities like Reddit, most people are doing some version of:
-
Find a format that already works
-
Recreate it with different prompts
-
Post multiple variations
3 Content Formats That Actually Work
1. Visual Shock Videos (Fastest to Go Viral)
Examples:
-
"What if cities were underwater"
-
"AI creates the future of Earth"
Why this works:
-
No story needed
-
Pure visual impact
-
Stops scrolling immediately
Best tools:
-
Google Veo
-
Seedance 2.0
-
Runway ML
2. Short AI Story Videos (Consistent Growth)
Typical structure:
-
2–4 short scenes
-
Simple emotional hook
-
One clear idea
Real workflow creators use:
-
Generate a 2–3 sentence script
-
Turn each sentence into a clip
-
Stitch clips together
Why this matters:
Most AI video tools generate only 5–10 seconds per clip, so creators build stories in pieces, not in one go.
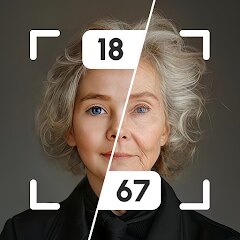
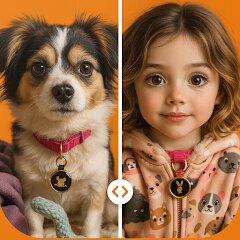
3. Transformation Content (Most Reliable for Reach)
Examples:
-
Cartoon → Realistic human
-
City → Post-apocalyptic
-
Animal → Cyberpunk version
Real technique used:
Generate an image first, then turn it into video
Why:
-
Easier to control visuals
-
Higher consistency
-
Lower cost than pure video generation
Step 3: Use Structured Prompts (This Is Where Most People Fail)
The biggest mistake beginners make:
writing long, complicated prompts.
AI video models don't work like humans — they respond best to clear visual keywords.
The Prompt Structure That Actually Works
Use this format:
Subject + Action + Environment + Style + Camera
Real Example
Bad prompt:
"a cool futuristic city with lots of lights and details"
Good prompt:
"futuristic cyberpunk city, neon lights, flying cars, night scene, cinematic camera pan, ultra realistic"
Why This Works
Models like:
-
Google Veo
-
Seedance 2.0
are trained on visual patterns, not storytelling language.
They understand:
-
objects
-
motion
-
lighting
-
camera behavior
Practical Prompt Tips From Real Users
1. Add camera motion
Examples:
-
slow motion
-
camera pan
-
drone shot
This alone can dramatically improve quality.
2. Generate multiple versions
No one gets perfect output in one try.
Typical workflow:
-
Run the same prompt 5–10 times
-
Pick the best result
3. Keep clips short
Most tools generate:
-
5–10 seconds per clip
So you should plan content in segments.
Step 4: Scale Video Production with ComfyUI Workflows (Advanced Method)
If you've already made a few AI videos, you'll quickly run into a problem:
manual generation is too slow.
This is where tools like ComfyUI come in.
What Is ComfyUI (And Why Creators Use It)
ComfyUI is a node-based AI workflow tool (similar to a visual programming system).
Instead of clicking buttons in apps, you build a pipeline like:
-
Input prompt
-
Generate image
-
Apply motion
-
Export video
Everything is connected as a workflow.
Why ComfyUI Is Powerful for Video Creation
Most beginner tools:
-
Generate one video at a time
-
Require manual input
ComfyUI allows you to:
-
Generate multiple outputs automatically
-
Reuse workflows
-
Batch process prompts
-
Combine multiple AI models
This is why many advanced creators switch to it.
Real Use Case: Batch Generating AI Videos
Instead of:
Generate one video → download → repeat
You can do:
Input 10 prompts → generate 10 videos automatically
Basic ComfyUI Video Workflow (Simplified)
Here's what a typical pipeline looks like:
1: Prompt Input Node
-
Write multiple prompts
-
Or load from a text list
2: Image Generation (Stable Diffusion)
Use models to generate base frames:
-
Characters
-
Environments
-
Scenes
3: Motion / Animation Nodes
This is where video is created.
Common approaches:
-
AnimateDiff
-
Frame interpolation
-
Camera motion simulation
4: Frame Sequence Output
Export:
-
Image sequence
-
Or video file
5: Final Editing (CapCut)
Even with ComfyUI, you still finish in:
-
CapCut
Why Many Creators Use "Image → Video" Instead of Direct Video
Even with tools like:
-
Google Veo
-
Seedance 2.0
A lot of creators still prefer:
Image → animation → video
Because:
-
More control over visuals
-
More consistent characters
-
Easier to fix errors
Real Scaling Strategy (Used by Advanced Creators)
Here's a common pipeline:
-
Generate 20 prompts
-
Batch create images in ComfyUI
-
Convert images into short clips
-
Export all clips
-
Assemble multiple videos in CapCut
Result:
1–2 hours = 10+ videos
When You Should Use ComfyUI
Use it if:
-
You want to scale content production
-
You are making videos daily
-
You want automation
Do NOT use it if:
-
You are just starting
-
You only make occasional videos
Step 5: Editing and Pacing Matter More Than AI Quality
A common misconception:
better AI = more views
In reality:
editing and pacing matter more than the model you use
3 Things That Actually Affect Performance
1. The first 2 seconds decide everything
If your video doesn't grab attention immediately, people scroll.
What works:
-
Start with motion
-
Show the most interesting frame first
-
No slow intro
2. Looping increases views
Many viral videos are designed to loop seamlessly.
Technique:
-
End frame connects to first frame
-
No clear "ending"
This increases watch time automatically.
3. Captions are essential
Most users watch without sound.
Add:
-
Short captions
-
Key phrases only
-
Sync with visuals
Why CapCut Is Used by Almost Everyone
CapCut is widely used because it offers:
-
Auto captions
-
Quick cuts
-
Built-in effects
-
Easy mobile editing
For most creators, editing tools matter more than generation tools.